As I was browsing through my Pier One Imports catalog I came across a nice piece of furniture. Since I couldn’t afford to buy it at my scale, I thought I would try to make it in miniature.
After I took a screen shot of it on their website, I distorted it to be straight and the size I needed using Adobe Photoshop. This will be for personal use only, otherwise I would have used a royalty free image.
Cut 2 pieces of mat board at 1 1/4” x 2 1/4” for the sides.
Cut 2 pieces of mat board at 3” x 2 1/4” for the back and front.
Cut 2 pieces of mat board at 3 3/8” x 1 3/8” for the top and bottom.
Sand the top and bottom so the top edges are rounded.
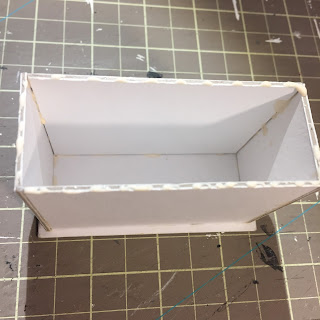
Glue the sides and the front/back together.
Glue those to the bottom (make sure the rounded edge is facing up) and glue the top piece on (make sure the rounded edge is facing up). Be sure they are flush at the back. There should be a lip hanging over on the front and sides.
Wipe away any extra glue with a scrap piece of board. Mark the bottom as “bottom” for the sake of confusion.
Cut 6 strips at about 1/8” x 11” long from cover stock and glue pairs together.
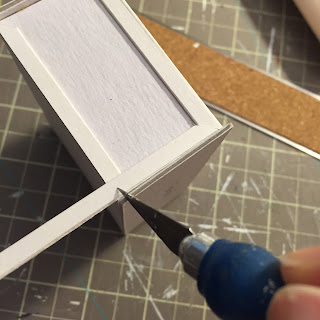
Measure and cut the side lengths. Then, using your cutting board squares, cut the 45 degree angle so the pieces will fit in neatly.
Glue the front trim on. No need for 45 degree angles here.
For the legs, I glued two beads and a wood dowel piece together. I used white glue because I will have everything on my work table stuck to my fingers if I use Super Glue. But if you have a better relationship with Super Glue that would be ideal.
Then I used my pencil sharpener to shave a wood dowel and cut the tip off with my mini miter box and saw.
You can use the first one you cut to hold to the tip of the newly shaved dowel to be sure each are the same. You will need four of these.
Glue the beads together, let dry, then glue the dowel tip on. Let dry.
I stuck all of my legs to a piece of board with wax and then spray painted them white. (Actually it was cream because I had no white in stock.)
Super Glue them to the base of the dresser. Yay, I used Super Glue this time with no issues!
I swear I am usually like a cat with tape stuck to its paws with that glue!
Paint your dresser and legs with white acrylic paint. I used Ceramcoat white. Don’t paint the inset on the front where the drawers will go (not necessary).
Drawer fronts
I cut a piece of cover stock paper to the size of the front (inside the trim).
Then I painted a section of a sheet of cover stock with the same white paint. Once dry, I sanded it very lightly and wiped it with a cloth.
Print out your image on this section. If you can, using Photoshop or another program, divide your image to 3 sections for the three drawers. Add some cut marks off to the side of the image in your program.
This was the first time I ever printed on painted paper. I was amazed. The quality was better then plain paper.
Cut your printed section out as shown above. Put glue on the other piece of cover stock you cut to size. I used Yes paste. Glue it to the back of the printed section and use those holes to be sure it is centered. I did it this way because a have about a 1/16" wiggle room on the left and right just in case.
Leave it to dry with weight on it. Here is the back. Disregard the dark smears. Before I had the idea to use the wooden dowel that was sitting a few feet away I was cutting lead pencil tips and it left a mess.
Cut out your drawer fronts and sand the front bottoms lightly with fine sandpaper.
Glue them in with wood glue. Be sure to get the edges so it wont curl up, but not so much that it will seep through.
Mark with a pencil where the knobs will go. I used tiny pearl beads I had in my stash and painted them the same white.
When dry, glue them on and touch them up with Tacky Glue to fill in the holes. Let dry and paint the tips white.
Once that paint is dry then spray the entire piece with a Satin varnish spray.
I had some fun and went to visit Pier One Imports after I made this. The girls working the floor were full of questions and excitement. They insisted on moving some furniture around to get photos.
I love this piece and it looks great in my Kinfeld. So the next time you are swooning over a catalog item try making it in miniature.
I share a lot of tutorials and ask nothing in return. I would like to only ask if you use them please share something from yourself with another in our miniature world. I honestly think generosity is what makes our art form extra special.
Thanks for visiting!


Beautiful!
ReplyDeleteI love it! :D
ReplyDeletePier 1 is the best! And your interpretation of the dresser is wonderful! Great tip about printing on painted paper - I am going to give that a try!
ReplyDeleteA Round of Applause for you and your mini Pier 1 dresser,Auralea! Your version of it is Spot On! :D
ReplyDeleteelizabeth
Hi Aurelia, I used your tutorial to make a dresser for a mini scene and I just love it! Thank you for making this so easy to read and follow! :)
ReplyDeleteGreat job!!!
ReplyDeleteGreat job!!
ReplyDelete