Friday, January 22, 2016

Dollhouse wainscoting


First, I drew out the design on card stock. Standard wainscoting is 3 foot tall so in 1:12 scale that's 3".


Then I cut the mat board to size and glued it onto the card stock with wood glue. Then filled in any gaps with a light spackling paste.

For the base molding, I used fine sand paper to round the top then made two slices with a craft knife at an angle and pulled out the center strip leaving a small gap.
Spray-paint the entire thing with an enamel paint. This is really important because if you don't the card stock will ripple when you paint it with a water based craft paint.
I painted mine with satin Behr paint because I had it left over from my real house.


Put wood glue on the back, but only behind the mat board. Again, if you put it on the card stock it might ripple.


There it is!

William Morris wallpaper. I have loved William since I discovered him back in art college. He was an amazing designer so I always try to have at least one wall in each dollhouse of his design.


As always, I hope this will help others bring their little dream house to life! :)

Monday, January 11, 2016

Finished dollhouse stairs


I made the railing with paper clay. First I made a long tube of clay and placed it on the spindles, pressed it in, and shaped it. Once it dried I sanded it with sandpaper and carved at it with a knife, glued it onto the spindles, and because this clay shrinks I added more to the end where it touches the post along with some wood glue so it wouldn't pull away as it dried. 
Once dry and sanded I painted that end with the dark wood stain that I used on the post and then highlighted it with a lighter brown acrylic paint.

The rail cuts off before the last spindle on the second floor so I can add to it once I get up there.

Click here to read how I did the rest.

Ah I'm so happy! That was the one part I was worried about. The rest will be fun, fun, fun!

Sunday, January 3, 2016

Dollhouse stairs

I loath making dollhouse stairs. I actually promised myself after the last build that I would never do it again, but I got suckered into it once again! 
I had a stair kit in my stash so I cut off the top step and then shaped the base to look like I wanted. 
The step tops were separate pieces of wood with predrilled holes for the spindles. I sanded the edges round and painted the edges with brown and then covered them with the same flooring print out using Yes Paste. The base step is mat board.
The railing will be the last step, but I will put it off as long as possible because It’s the worst part for me.

I build out the sides with wainscoting and added a small coat closet in the back. This is as far as I have gotten with them for now. Once I get to the upstairs I will finish them off.

I will be sharing a wainscoting tutorial once I get to the dining room. The part going up the steps was much to complicated to explain in detail.


I must say I like them so far! 


Friday, January 1, 2016

Building a dollhouse using foam board

I am pulling inspiration from these three houses.

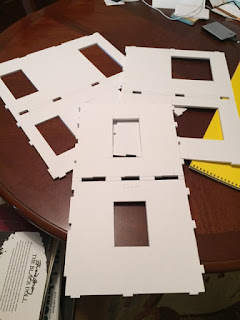
After much thinking and planning I decided to use a tab and slot technique to assemble the house. This would make it nice and sturdy. Foam board is a dream to cut with an EXACTO knife.
I would highly recommend buying a knife with a soft body and glue gun finger guards. The tips of my fingers became numb and I had a blister.
After cutting tabs into the floor I worked on one wall at a time considering the floor, next wall, ceiling and the same for the next floor up. Once all the walls were finished I cut the ceiling/send story floor and then the third story floor. I was amazed I only had to make a few simple adjustments and it all fit together easily! 


I used wood glue for some of the floor tabs and a hot glue gun for the rest.


To secure the walls in the interior I pushed a pin through the second story floor down into the center of the first floor wall.

I have made a house with the tab and slot method from wood and I have to say foam board is so much more fun!

Foam board tips:
Purchase board that are the least warped. I bought the foam board dilly board packs because they were a little thicker and less warped.
When cutting focus on keeping your blade angle straight down to you don’t get beveled edges.
Discard dull blades, keep them sharp.

Glue gun tips;
Be sure there are no thick blobs. Melt them down with the tip of the gun as you go. 

Hold seams together until glue cools.

My original drawing plans: