I decided to make my own cabinets for the Kinfeld because the ones I had from another dollhouse that I sold didn't fit correctly.
I used balsa wood for this because I could cut it with my craft knife instead of going to the basement to use my skill saw (I don't always cut a straight line on that thing.)
First I researched features I would like in my design. Then I decided what to twist and compromise on to work in my space and to work within my skill set. One thing I have learned over the years is to not torture myself to try and make something I am not capable of. At the same time I do try and push myself to learn and get better with each project.
So I sketched some plans and worked with 1/8" thick balsa wood. I made a few corrections along the way, but here is my chaos!

So first I cut my large piece of balsa for the front of this cabinet section and covered it with card stock. Initially I painted Mod Podge on the balsa and it warped so I painted the other side and it flattened again and stayed under a book, then I used wood glue to adhere the card and flattened under a book again. This was when I was thinking of painting right on the wood. I thought Mod Podge would help fill in the wood pores. So I switched and used card instead.
I drew my cabinets on an even thicker card and cut out the frame and the drawer/cabinets holes where it would sink in. I popped the cabinet drawer/door frames back in the main frame and traced that (piece on bottom left).

Then I glued the layers on a piece of foam board because I wanted it to come out from the front for the sink area to give some dimension.


I printed a granite texture but didn't have my fixative spray before I varnished it so it changed the color. I went in with paints and restored it then sealed it again.


 I forgot the crown molding space and had to rip all my work off and start over.

There we go. Much better!


Created my backsplash in Photoshop using a square sample. Had to slowly piece it together. Sprayed with fixative. Then touched up "glass tile" with a high gloss varnish twice.

I used Yes! Paste to put the backsplash up.


Stove top was dowloaded, enhanced in Adobe Indesign, printed - White "buttons" were enhanced with a white gel pen, then varnished, glued to card, edges were colored with black marker, and glued to counter.


I used balsa wood for this because I could cut it with my craft knife instead of going to the basement to use my skill saw (I don't always cut a straight line on that thing.)
First I researched features I would like in my design. Then I decided what to twist and compromise on to work in my space and to work within my skill set. One thing I have learned over the years is to not torture myself to try and make something I am not capable of. At the same time I do try and push myself to learn and get better with each project.
So I sketched some plans and worked with 1/8" thick balsa wood. I made a few corrections along the way, but here is my chaos!

So first I cut my large piece of balsa for the front of this cabinet section and covered it with card stock. Initially I painted Mod Podge on the balsa and it warped so I painted the other side and it flattened again and stayed under a book, then I used wood glue to adhere the card and flattened under a book again. This was when I was thinking of painting right on the wood. I thought Mod Podge would help fill in the wood pores. So I switched and used card instead.
I drew my cabinets on an even thicker card and cut out the frame and the drawer/cabinets holes where it would sink in. I popped the cabinet drawer/door frames back in the main frame and traced that (piece on bottom left).

Then I glued the layers on a piece of foam board because I wanted it to come out from the front for the sink area to give some dimension.


Then I glued that to the center of the full front piece.

I experimented here so I will only share what I will be doing for the next sections now that I figured it out. I painted all of it with Mod Podge to seal the paper. Then painted with a white gloss paint. Then used Elmer's glue along all the inset edges to make them curve in. I put the glue in the edges and wiped away with my finger and the glue stayed in the edges. I did this a few times all over in between other projects. Then, once the glue was dry, I painted white and sealed with matt varnish. In between any coat of anything that was painted I ran a needle tool in the crevasses where the drawers and cabinets would open to get any paint out.

I put small silver beads that I had for knobs and slid it into place.
The side cabinets will butt up against this piece.

I can't get into how I did the actual construction because I don't even know myself! I just drew, measured, cut and tried to think ahead with each step.
I decided not to make anything open because I have never gone in and opened any cabinets I have had in the past. Plus a few uppers will have glass doors and there will be one very important drawer that opens, but I will save that surprise! Oh it's going to be so cool!
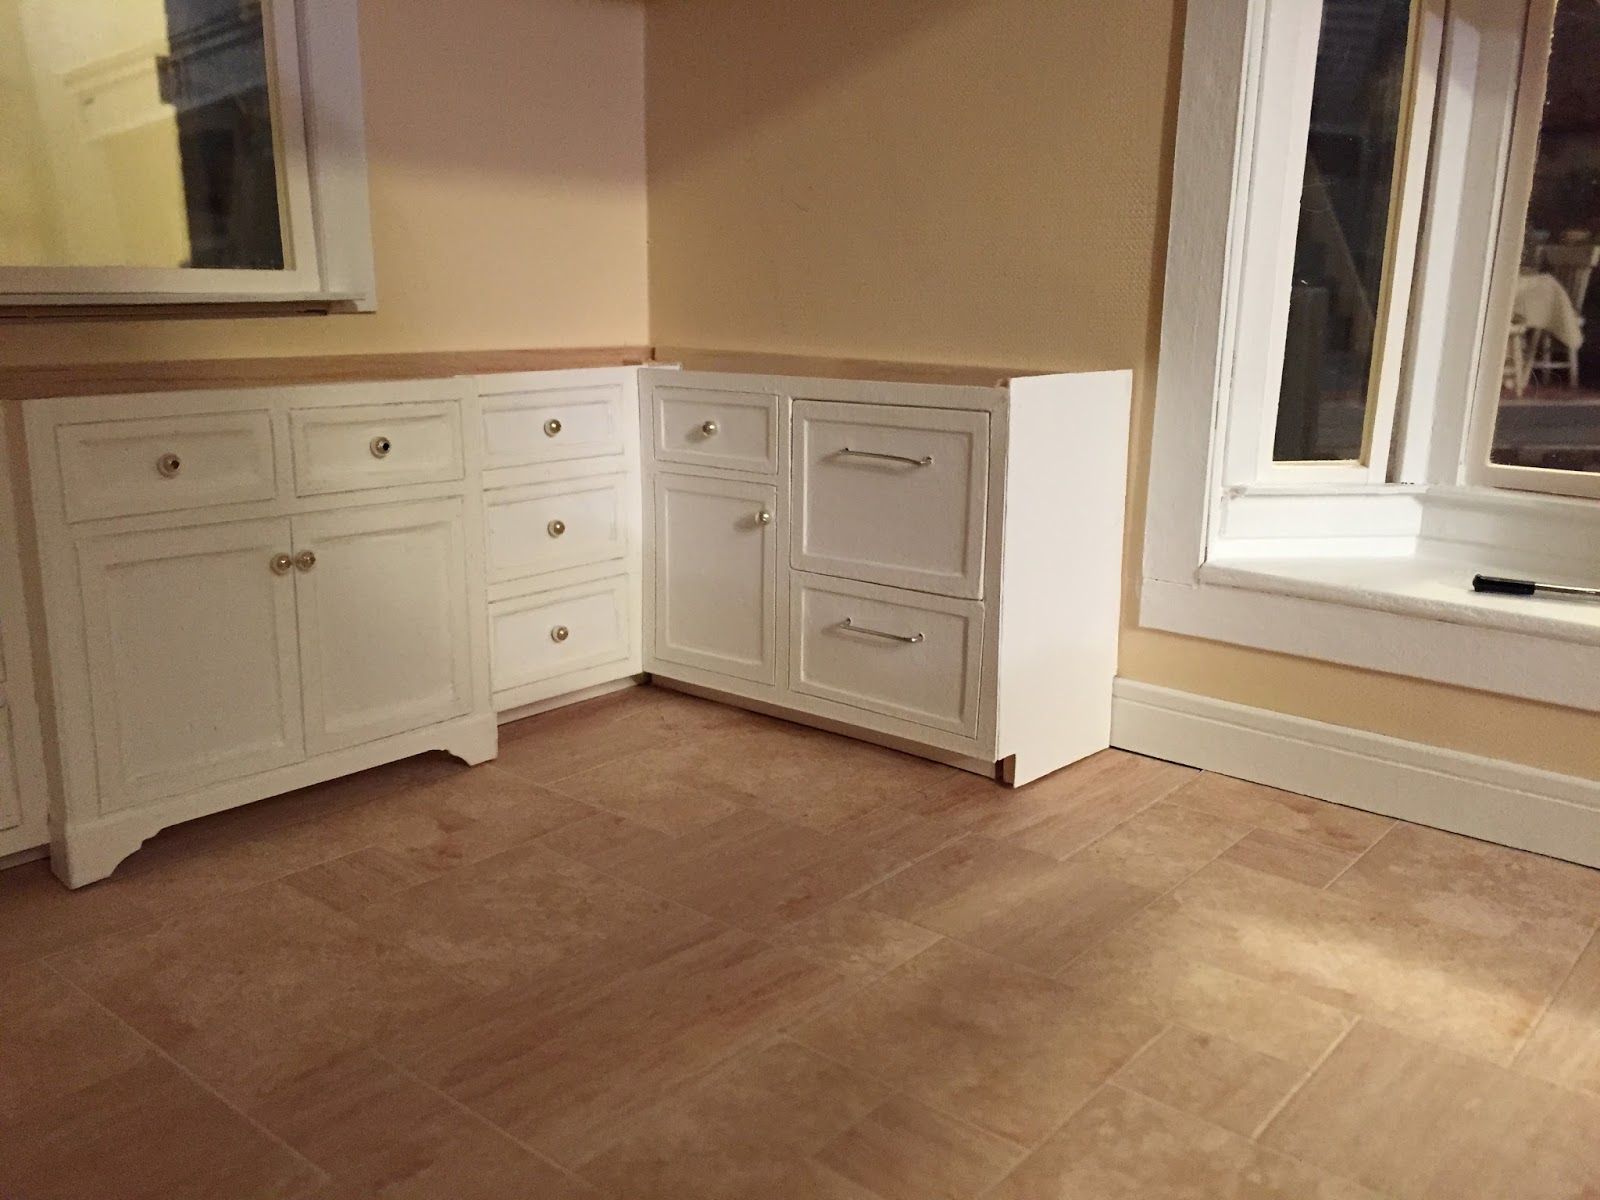
I finished the right side.
I didn't have room for a refrigerator so I decided to make some modern refrigerator drawers!

Got the other side finished!
Dishwasher is in the back left and trash cabinet is on the left next to it. Love that these items are designed into the cabinets these days. Makes my job easier!


I printed a granite texture but didn't have my fixative spray before I varnished it so it changed the color. I went in with paints and restored it then sealed it again.


The "dishwasher" is behind the back left panel as well as the "trash bin". There will be a flat top stove on the counter above the oven. Making a modern kitchen in some ways is much easier!


There we go. Much better!


Created my backsplash in Photoshop using a square sample. Had to slowly piece it together. Sprayed with fixative. Then touched up "glass tile" with a high gloss varnish twice.

I used Yes! Paste to put the backsplash up.


Stove top was dowloaded, enhanced in Adobe Indesign, printed - White "buttons" were enhanced with a white gel pen, then varnished, glued to card, edges were colored with black marker, and glued to counter.

All done!


